Wednesday, April 26, 2017

How to configure Cisco IOU L2 L3 with GNS3 | Switching in GNS3

Cisco IOS on Unix, also known as Cisco IOU,  is released for internal Cisco use only. IOU permits to run IOS natively on x86 platform while GNS3 must emulate the whole hardware. The big difference is that IOU can run more IOS instance than GNS3, but GNS3 can run real IOS version. The purpose of this article is to let you know how IOU can be integrated with GNS3 emulator software to practice switching concepts.


Requirements to run Cisco IOU on GNS3

1. GNS3 v 1.3.13
2. Download VMware WorkStation 12 from Official Site
3. Necessary Files

Step 1: Download Necessary files


from this link ========> Google Drive

download the following files from the link above:
GNS3-1.3.13-all-in-one.exe
GNS3.IOU.VM.ova
IOURC.txt
CiscoIOUKeygen.py

from this link ========> Google Drive 2

- Download the Cisco L2 & L3 IOU.rar

After you download all required files, Extract all zipped files, and Install Vmware WorkStation and GNS3 on your device.

Step 2: Booting up GNS3.IOU.VM


After you successfully downloaded GNS3.IOU.VM and installed VMware workstation  its time to boot it up 

Open GNS3.IOU.VM.ova

Press Import 


you may get a notification message Click Retry. it will boot up.


Use username root and password cisco to login into the appliance. 

Go to Player ---->  Manage ----> Virtual Machine Settings --->Network Adapter

Choose NAT 


Next Step Type in Console: Reboot 

Once it rebooted Login Back and type the following command: 

pip3 install gns3-server==1.3.13

Then again  Go to Player ---->  Manage ----> Virtual Machine Settings --->Network Adapter---->Choose Host-Only

Type: Reboot 

Once the machine loaded successfully Type the following command: ifconfig  write down the IP address 


On your browser open a new tab and type the following: http://192.168.61.130:8000/upload

Note: you may have different private IP address 


Upload the files: CiscoIOUKeygen.py and the 2 files inside Cisco L2 & L3 IOU.rar


Type the following command on VMware :cd  /home/gns3/GNS3/images/IOU/


Then type this:  python3 CiscoIOUKeygen.py

STEP 3: Configuring GNS3 

Open GNS3 

By default, GNS3 is binded with server address 127.0.0.0:8000. We have to change this value with our new IOU server address. Follow the below instructions to bind the new server.

Go to Edit -> Preferences -> GNS3 Server. Click on Local server tab. From the Host Binding drop down window select '192.168.61.1'. Make sure that port is also set to 8000. Then click Apply and OK.


Again go to Edit -> Preferences -> GNS3 Server. This time click on Remote access tab. Add a host by entering UNIX GNS3 IOU VM IP address that we found using ifconfig (mine 192.168.61.130) and 8000 as port.


press on IOS on UNIX and Apply the : IOURC.txt file here 


Once you have given license file details, click Apply. And now go to IOU Devices, click New button and select server type as Remote. Your remote server will be listed there → Next


Here you will receive a message “You have chosen to use a remote server, please provide the path to IOU image located on the server!”, just click OK.

Now type a Name for the IOU image and set IOU image path to be the one that you noted already while uploading the image through the browser. Refer the snapshot below to understand what I am trying to say,

/home/gns3/GNS3/images/IOU/i86bi-linux-l2-adventerprisek9-15.1a.bin


Click Finish! Yes, we are done with all the configurations. By repeating the above steps, you can upload as many as images you want and you can add them to your GNS3 emulator window. For example, I have uploaded 2 images (L3 and L2) as shown below.


Now go to GNS3 main window, pull the configured IOU devices. Power them on, start building your labs! Since you can configure all the devices inside your GNS3 itself, I guess this method is much better than IOU Web.


Friday, March 24, 2017

How to Fix Browsers are not working,but internet connection is fine

Some malware variants modify Internet browser settings by adding a Proxy Server. In these cases, you will be unable to visit any websites, and thus not able to download the required software to eliminate the security infections. Other types of malware change the computer's DNS settings or add various entries to your operating system's Hosts file. By altering these settings, computer viruses can cause redirect issues or completely block the Internet connection.

Follow me to Solve your Problem,

First of All this Step is optional but i Recommend doing it .

Step 1: Reboot into Safe mode with networking.( while the system is booting keep pressing F8 ).


After it boots Successfully , Press  Start> In search box type cmdRight click on cmd.exe
or / Press Run and type : cmd.exe

However you can still do this without Safe Mode but make sure you are running cmd as an administrator 

Step 2:  

Type in the following, followed by enter

netsh winsock reset

Enter

Restart PC

Step 3 :
Open cmd once again 

Type in the following, followed by enter for eachipconfig /flushdns

Enter

ipconfig /release

Enter

ipconfig /renew

Enter

Step 4: 

Test if the browser can now open browse the web , if no  no matter what browser you use you have to open Internet Explorer
press on top and right click, choose menu bar.
press on tools ,choose Internet Options ,Choose Advanced press on Restore Advanced Settings then Press Reset .

Monday, December 5, 2016

How to Display & Fix Cisco Networking Academy Flash Content (CCNA v5)

There is a problem to display the curriculum by default as it contain embedded flash animation , CCNA Exploration could open but it won't launch.


Problem Preview : 


Solution : 

First of all make sure you have Adobe AIR and Adobe Shockwave Installed on your computer.
you could install here;

Then follow these steps : 


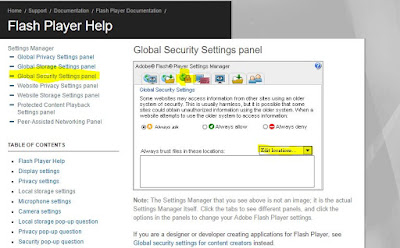
1- Right Click on the Flash Content and Press Global Settings.


2-Choose Global Security Settings and then Press Edit Locations.


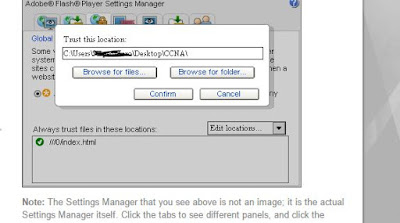
3-Press Add location and then Browse by Folder , Put The PATH of your CCNA Course Folder


4-Press Confirm and Reload your Browser .


DONE ENJOY, BEST OF LUCK

Sunday, June 26, 2016

How to Fix Snapchat won't let you add friends ( toast message saying "Forbidden" )

How to Fix Snapchat won't let you add friends  and a toast message will appear saying its "Forbidden" 

or  if so you may see a message when you try to use Snapchat that says “The network you are connected to has been temporarily blocked because of suspicious activity" 


The Solution is Simple Follow these Steps :-
1-Download  Cloud VPN Cloud VPN <==== OR ===> Opera Free VPN
2- Install the Application 
3- Open it 
4- Click on TAP TO CONNECT


5- Open SnapChat and try to add now it should be working just fine ;-) 

Tuesday, June 21, 2016

How to Fix Gyroscope and Accelerometer/orientation sensors not working on Xperia

Solution is simple, you just need to boot once into Safe Mode and Exit.

How ?


If you experience any problem with your phone, booting it into safe mode can be a good idea to check if any third party applications might be involved in the problem you’re having.

If you run your phone in safe mode for a while and you don’t experience any problem, the problem you’re having is most likely related to a third party app that you’ve installed.

How to boot into safe mode differ from models to model and it can also be different depending on firmware version but this topic will explain to you how to do it.

Turn on and use safe mode


  1. Press and Hold the Power key then Touch and keep holding the Power OFF.


2.  Tap OK on the Safe Mode prompt. The device will restart in safe mode.


3.  safe mode.


Turn off safe mode


To turn off safe mode, follow these steps:

  1. Touch and hold the Power key.
  2. Tap Power off.
  3. Once the phone is off, touch and the hold the Power key again to restart.

Tuesday, September 16, 2014

How to Unbrick & Fix Acer Iconia A3-A10 stuck in a bootloop

How to Unbrick & Fix Acer Iconia A3-A10  stuck in a bootloop


Step 1: Download the Acer Iconia A3-A10 Firmware Click to download .
Step 2: Download SP Flash Tool Click here to download . ( you may find different version, but this one only works with A3-A10).
Step 3: Turn off the tablet via long press power button, or insert a needle in a hole between the HDMI and the speaker.
Step 4: Remove the back Cover of the tablet, and unplug the battery 


Step 5: Insert usb cable and connect to PC, let windows install the mtk65xx driver, once its done , download usb view and unistall the installed driver and follow instructions from this site here .
or you can check this you tube video .


NOTE: For window 8/8.1 you need to disable Driver Signature check.


Step 6:  Launch SP Flash Tool.
- Press "File" -> "Open Scatter-loading file..." and choose mt****_Android_scatter_emmc.txt from       firmware folder.- Press "Window" -> "Write Memory". New tab will appear, open it.- Press "Open Raw Data...", choose secouff.img from firmware folder.- Choose EMMC Memory setting.
- Put 0x3D80000 in begin address(HEX).
- Put whatever the value in File Size in Container length (HEX).
-Press "Write Memory", connect turned-off tablet to PC and wait.
-Progress bar will fill with red, then with gray-green, then ou will see grenn circle.
- Disconnect tablet from PC, go to Download tab.

Step 7: -Press "Firmware -> Upgrade" and connect your turned-off tablet to PC.
-Progress bar will fill with purple for few times, then red, then flash with green few times, then yellow, and then (probaly) gray-green. After this you will see green circle.


-Reconnect the Battery, and power it ON.
- Bricked tablet's battery may be extremely low, so put it on charging for 10 minutes after flashing.


Saturday, August 17, 2013

Using PlayStation 3 Controller with Android device !!!

You can never have enough controllers, right?

These wonderful little devices can be used with more than just an actual Playstation 3 of course . so  i’d like to show you how you can play all those awesome Android games with a PS3 controller. The process is easier than I thought, and you don’t need a special OTG USB cable , we’ll be using Bluetooth.

Here’s what you do need, though:
  • An official PlayStation 3 controller. Support for unofficial ones is not guaranteed even if the initial detection works.
  • A rooted and compatible Android phone.
  • A standard mini-USB to USB cable (comes with a PS3, any pretty much every digital camera ever sold).
  • A Windows PC.
  • Sixaxis Controller Application.
Here is a video showing PS3 controller connected to android in action .
in the this video i used Galaxy note (GT-N7000) & Nexus 7.
Games used : PES12 & Dead Trigger.


P.S :if you need any help in rooting your device or installing sixaxis app feel free to contact me on my email: reslan912@gmail.com